Tutorial 2 - Making it interesting
In Tutorial 1, we generated a stub project that was able to run, but we didn’t write any code ourselves. Let’s take a look at what was generated for us.
What was generated
In the src/helloworld directory, you should see 3 files: __init__.py,
__main__.py and app.py.
__init__.py marks the helloworld directory as an importable Python
module. It is an empty file; the very fact it exists tells the Python
interpreter that the helloworld directory defines a module.
__main__.py marks the helloworld module as a special kind of module -
an executable module. If you try to run the helloworld module using
python -m helloworld, the __main__.py file is where Python will start
executing. The contents of __main__.py is relatively simple:
from helloworld.app import main

if __name__ == '__main__':
    main().main_loop()
That is - it imports the main method from the helloworld app; and if
it’s being executed as an entry point, calls the main() method, and starts the
application’s main loop. The main loop is the way a GUI application listens for
user input (like mouse clicks and keyboard presses).
The more interesting file is app.py - this contains the logic that creates
our application window:
import toga
from toga.style import Pack
from toga.style.pack import COLUMN, ROW

class HelloWorld(toga.App):
    def startup(self):
        main_box = toga.Box()

        self.main_window = toga.MainWindow(title=self.formal_name)
        self.main_window.content = main_box
        self.main_window.show()

def main():
    return HelloWorld()
Let’s go through this line by line:
import toga
from toga.style import Pack
from toga.style.pack import COLUMN, ROW
First, we import the toga widget toolkit, as well as some style-related
utility classes and constants. Our code doesn’t use these yet - but we’ll make
use of them shortly.
Then, we define a class:
class HelloWorld(toga.App):
Each Toga application has a single toga.App instance, representing the
running entity that is the application. The app may end up managing multiple
windows; but for simple applications, there will be a single main window.
Next, we define a startup() method:
def startup(self):
    main_box = toga.Box()
The first thing the startup method does is to define a main box. Toga’s layout scheme behaves similar to HTML. You build an application by constructing a collection of boxes, each of which contains other boxes, or actual widgets. You then apply styles to these boxes to define how they will consume the available window space.
In this application, we define a single box, but we don’t put anything into it.
Next, we define a window into which we can put this empty box:
self.main_window = toga.MainWindow(title=self.formal_name)
This creates an instance of a toga.MainWindow, which will have a title
matching the application’s name. A Main Window is a special kind of window in
Toga - it’s a window that is closely bound to the life cycle of the app. When
the Main Window is closed, the application exits. The Main Window is also the
window that has the application’s menu (if you’re on a platform like Windows
where menu bars are part of the window)
We then add our empty box as the content of the main window, and instruct the application to show our window:
self.main_window.content = main_box
self.main_window.show()
Last of all, we define a main() method. This is what creates the instance
of our application:
def main():
    return HelloWorld()
This main() method is the one that is imported and invoked by
__main__.py. It creates and returns an instance of our HelloWorld
application.
That’s the simplest possible Toga application. Let’s put some of our own content into the application, and make the app do something interesting.
Adding some content of our own
Modify your HelloWorld class inside src/helloworld/app.py so that it
looks like this:
class HelloWorld(toga.App):
    def startup(self):
        main_box = toga.Box(style=Pack(direction=COLUMN))

        name_label = toga.Label(
            "Your name: ",
            style=Pack(padding=(0, 5))
        )
        self.name_input = toga.TextInput(style=Pack(flex=1))

        name_box = toga.Box(style=Pack(direction=ROW, padding=5))
        name_box.add(name_label)
        name_box.add(self.name_input)

        button = toga.Button(
            "Say Hello!",
            on_press=self.say_hello,
            style=Pack(padding=5)
        )

        main_box.add(name_box)
        main_box.add(button)

        self.main_window = toga.MainWindow(title=self.formal_name)
        self.main_window.content = main_box
        self.main_window.show()

    def say_hello(self, widget):
        print(f"Hello, {self.name_input.value}")
Note
Don’t remove the imports at the top of the file , or the main() at the
bottom. You only need to update the HelloWorld class.
Let’s look in detail at what has changed.
We’re still creating a main box; however, we are now applying a style:
main_box = toga.Box(style=Pack(direction=COLUMN))
Toga’s built-in layout system is called “Pack”. It behaves a lot like CSS. You define
objects in a hierarchy - in HTML, the objects are <div>, <span>, and other DOM
elements; in Toga, they’re widgets and boxes. You can then assign styles to the
individual elements. In this case, we’re indicating that this is a COLUMN box - that
is, it is a box that will consume all the available width, and will expand its height as
content is added, but it will try to be as short as possible.
Next, we define a couple of widgets:
name_label = toga.Label(
    "Your name: ",
    style=Pack(padding=(0, 5))
)
self.name_input = toga.TextInput(style=Pack(flex=1))
Here, we define a Label and a TextInput. Both widgets have styles associated with them; the label will have 5px of padding on its left and right, and no padding on the top and bottom. The TextInput is marked as being flexible - that is, it will absorb all available space in its layout axis.
The TextInput is assigned as an instance variable of the class. This gives us easy access to the widget instance - something that we’ll use in a moment.
Next, we define a box to hold these two widgets:
name_box = toga.Box(style=Pack(direction=ROW, padding=5))
name_box.add(name_label)
name_box.add(self.name_input)
The name_box is a box just like the main box; however, this time, it’s a
ROW box. That means content will be added horizontally, and it will try
to make its width as narrow as possible. The box also has some padding - 5px
on all sides.
Now we define a button:
button = toga.Button(
    "Say Hello!",
    on_press=self.say_hello,
    style=Pack(padding=5)
)
The button also has 5px of padding on all sides. We also define a handler - a method to invoke when the button is pressed.
Then, we add the name box and the button to the main box:
main_box.add(name_box)
main_box.add(button)
This completes our layout; the rest of the startup method is as it was previously - defining a MainWindow, and assigning the main box as the window’s content:
self.main_window = toga.MainWindow(title=self.formal_name)
self.main_window.content = main_box
self.main_window.show()
The last thing we need to do is define the handler for the button. A handler can be any method, generator, or asynchronous co-routine; it accepts the widget that generated the event as an argument, and will be invoked whenever the button is pressed:
def say_hello(self, widget):
    print(f"Hello, {self.name_input.value}")
The body of the method is a simple print statement - however, it will interrogate the current value of the name input, and use that content as the text that is printed.
Now that we’ve made these changes we can see what they look like by starting the application again. As before, we’ll use developer mode:
(beeware-venv) $ briefcase dev

[helloworld] Starting in dev mode...
===========================================================================
(beeware-venv) $ briefcase dev

[helloworld] Starting in dev mode...
===========================================================================
(beeware-venv) C:\...>briefcase dev

[helloworld] Starting in dev mode...
===========================================================================
You’ll notice that this time, it doesn’t install dependencies. Briefcase can
detect that the application has been run before, and to save time, will only
run the application. If you add new dependencies to your app, you can make
sure that they’re installed by passing in a -r option when you run
briefcase dev.
This should open a GUI window:


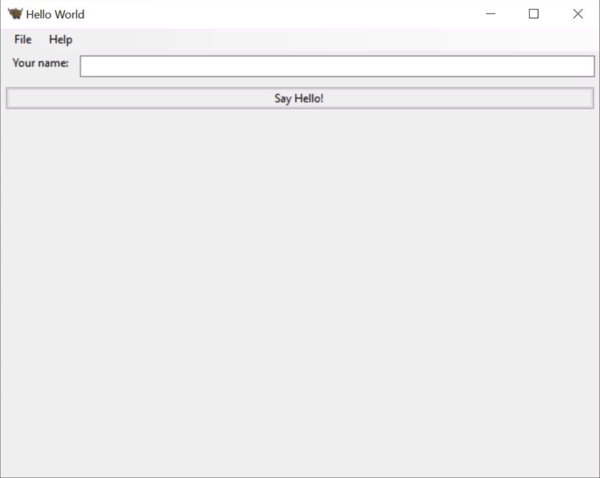
If you enter a name in the text box, and press the GUI button, you should see output appear in the console where you started the application.
Next steps
We’ve now got an application that does something a little more interesting. But it only runs on our own computer. Let’s package this application for distribution. In Tutorial 3, we’ll wrap our application up as a standalone installer that we could send to a friend, a customer, or upload to an App Store.